(Note: I wrote this 5-6 years ago. It started as a simple reply to a post in a forum helping a fellow out with monitor placement. I decided to expand on the subject and give him some overall basic tips. As I’ve learned more on the subject I would offer slightly different advice just because I know a bit more and learned a few tricks with trial and error. That said, this is still a pretty good reference for someone setting up a very basic 4-track type recording room on a very small budget. I promise I will write up an updated version of this in the near future.)
1) The Poormans Room Tuning
Not everyone can afford a really nice set of monitors and amps to mix with. One way I’ve found to get around this problem is a simple EQ solution.
Find a few CD’s you feel have the perfect mix. Choose a few different styles of music. Perhaps music similar to what you produce or ones where the mix just makes you go “wow”. Get a dedicated dual channel EQ and put it between the mixer and the amp. Run the CD’s you’ve selected dry through the mixer and adjust the new EQ until the CD sounds just right. Watch that you don’t over adjust. Sometimes all it takes is a slight bump in a highs or a decrease in the mids to make those speakers sound better. Don’t forget to adjust the volume every now and then. This will give you a good idea of a good working level for your speakers. Keep tweaking until you make it through all the CD’s. You might want to leave the room for a few hours (or a day or two) to let your ears adjust. Pop the CD’s back in and see how it sounds.
The first time you mix with the new EQ in place, do a rough mix and try to get it sounding the best you can. DO NOT tweak the speaker/amp EQ while mixing. When done, make a copy of your mix to play outside the studio. You might find you over adjusted a level. Perhaps the bass frequencies ended out a bit thin on your demo mix. Go back and give the bass a slight push down on the speaker/amp EQ then remix your track again.
Why down you ask? You are compensating for the lack of bass in your speaker/amp setup. This means you need MORE bass coming from the console and instrument sounds in your mix. By adjusting the bass lower on the speaker/amp EQ you force yourself to adjust the bass a bit higher in the mix. It seems backwards, but it’s not.
It might take a few times to get it just right, but once it is set right, you can just leave it. You may want to mark locations on the EQ just in case the settings get bumped.
2) Find the Sweet Spot
This is a tip that is very often overlooked.
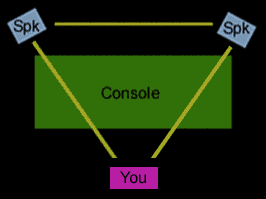
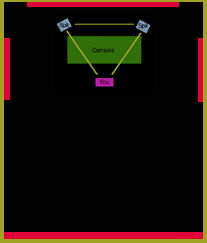
The sweet spot is the location between the monitors and the listener to which perfect stereo separation is found. To find the sweet spot for stereo mixing, you need a perfect triangle. If your monitors are 4 feet apart, measure four feet from each monitor towards where you would be sitting. This is the ideal spot for a stereo mix. Keep in mind, it doesn’t do any good to just set the monitors on the floor. Arrange the monitors at head height so they are looking right at your face.
3) Console Layout
Where to put the console in the studio?
When choosing how to lay out a mixer/monitor setup in a room, I always say go for the most space behind your head. If a room is 10ft x 15 ft, you would face the 10ft wall if you sit in front of the console. The further the wall behind you, the less likely you will get transients and other sounds hitting you in the back of your head (mucking up the mix).
If you have room, give yourself a bit of space between the wall and your console. This will help with running cables or re-running cables (which will almost ALWAYS happen no matter how much you try to avoid it). It almost always ends up that the monitors perch just behind the mixing board at the corners. Space between the wall and the monitors helps the sound fully develop.
4) Stop That Echo
In the whole scheme of things, 2″ Studiofoam Auralex tiles are your friend and can make your mix better.
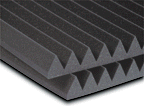 Auralex product catalogue states;
“2” Studiofoam: Our most popular seller and best overall performer. 2″ Studiofoam treats most small to medium sized areas including vocal booths, control rooms and studios. It effectively kills standing waves and flutter echoes and, when used in conjunction with LENRD Bass Traps, Venus Bass Traps or Sunburst Broadband Absorbers, can effectively tame the full frequency bandwidth in virtually any size room. 2″ Studiofoam is simply the workhorse of the industry.”
Buy them! Use them! BUT, don’t over absorb the room or your mixes will come out dry and plain sounding. A great way to find the main echo points of a room is to sit in the sweet spot in front of the mixer. Have a buddy move along the walls with a mirror flat against the wall. Every time you see the monitors reflection in the mirror, have your buddy stick a push pin into the wall at that spot. This is the main echo spot on the wall where your highs bounce off that reflective paint. Auralex tile that location and about a foot or so around it.
I also prefer to tile most of the wall behind the monitors. This is personal taste as some do not do this. My reason behind it is I have less transient sounds coming from the direction of the main monitors. Sounds reasonable right? Also, don’t forget the ceiling which is often overlooked in a project studio.
Another thing to watch out for is reflections directly off your console. They can harm your perception of the mix as much as the echo from the walls. Use the mirror trick again by laying the mirror face up directly on the console. If you can see the monitors reflection, you better give the console a deeper tilt. I currently use a custom made desk for my console which has a pretty deep tilt -which results in perhaps 20 degrees on the face of the console, but for years I had a 4 foot 2×4 wedged under the back of the console.
One thing I must point out. I don’t care who you talk to, those cardboard egg crate thingies don’t do a thing. They look nice but have nothing to offer. Carpeting the entire wall is also a VERY bad idea. Most carpet will do a fine job absorbing the very highs but don’t absorb much of the mids or lows. The sound literally ignores the carpet and passes right through it. This will cause an over abundance of mids and lows bouncing around the room. This is a bad thing.
This is not sound proofing. Your neighbours will still hear the thump of the bass. No amount of carpet, egg crate, or Auralex will soundproof a room. The only thing which does that is mass, and lots of it. But, that’s another issue and another story in itself.
(For more on these tiles, visit auralex.com)
5) The Back Wall
Depending on room size, the echo of the back wall can be somewhat important.
Many studios use what’s called a skyline diffuser. This is a panel which breaks the rate at which the echos arrive at your head from the back wall. They are often made of a semi-reflective plastic (or hardwood) in 2-3 inch squares which rise away from the wall at different depths, looking much like a big city skyline on it’s side. If you’ve ever heard the before and after difference of a skyline diffuser, it’s pretty incredible. Before, when you listen to the mix, you can tell the wall is directly behind you from the sound reflections coming from it. After the diffuser is in place, the wall virtually disappears.
Professional diffusers are pretty spendy, running around $100- 400 per 2x4ft panel. But all is not lost. You can create a cheap skyline diffuser out of various small plastic, metal and wood items attached to the wall. Anything, from the bottoms of plastic 2 liter pop bottles to metal ashtrays. If you’re creative, and have the right lighting and paint, this can look pretty cool as well. Just remember to use items of varied reflectiveness and bunch them together in groups. You can also cut varied length of wood (like a 1×1) from one inch to 5 inches and attach them randomly to a thin 1/8 inch plywood panel. The size of panel depends on the wall, but two foot square is a very workable size. Slap on several coats of semi-gloss paint, nail it to the wall and you’re good to go.
Auralex makes a product called the T’Fusor which acts much like the skyline but it is formed out of “lightweight-yet- sturdy high-impact thermoplastic”. They come in tiles close to 2 foot square and extend 5.5″ from the wall or ceiling. These are light enough to be thumbtacked or stapled to the wall.
 Auralex product catalogue states;
“The T’ Fusor combats hot spots and nulls by alleviating flat, reflective room surfaces and instead introducing scientifically-designed surfaces of varying shapes, sizes and angles. Standing waves and flutter echoes are obliterated without removing acoustic energy from the space or changing the frequency content of the sound. T’Fusors can enlarge your sweetspot & impart a sense of depth & spaciousness to your sound.”
I have not used this product before, but it sounds tasty.
Personally myself, I have placed a wide mixture of keyboards, shelves and computer monitors on the back wall which pulls diffusion off fairly well.
6) Speaker Space
Give yourself space for the sound to fully produce.
Sitting three feet from two 15 inch woofers is not a good idea. Large speakers really need a bit of volume pumping through them to produce the correct sounds. This is fine for a short time, but you don’t want to sit in a room listening to 140db for hours. Your ears will ring, you’ll become deaf and your nose might start to bleed.
You also need a bit of distance from any speaker to let the sound fully develop. For most monitors, 2 feet is too close.
Enter “near field” monitors. These are designed to have close to your mug (around 3-10 feet depending on make/model/etc.).
If you don’t have a large area for your studio, buy, beg, borrow or steal (but not mine) some near field monitors to use for main mixing. Yamaha makes an excellent set, the famed standard NS-10MS.
The only thing about the NS-10’s people complain about -myself included- is the Yamaha’s being a bit hard on the ears over time. Thus their nickname of “the screamers”. Great for reference in short bursts, but they are a bit tinny. That said, most people will also agree when it comes to stereo imaging, the NS-10MS monitors are hard to beat. They allow you to pick out stuff in the mix you couldn’t hear on other monitors. At the time of this writing, they list for $478.00 US, but you can often find them for $350 a pair. I will one day break down and buy a set of these bad boys.
I picked the JBL 4406’s for my main near field monitors. They sit about 6-7 feet from the sweet spot. I feel these are a good set of speakers which one can listen to for hours. But, some will disagree. Monitors are like wives or girlfriends. While I might really like mine, yours might drive me up the wall.
Hit the music stores and listen to several different monitors. Take some CD’s you know well (or even some of your own mixes you like the best). Take your time and check them all out. I listened for hours at perhaps 40 different pairs, in several different stores, across several different days before I decided on mine. I figured it was like the courting period before I finally said “I do”. (Don’t EVEN get me started on how I picked my amp)
Another note on speakers and placement. There is a newer product out (I forget the name) which is designed to be placed under the speakers. It’s this funny rubber mat and the idea is it absorbs the extra sounds coming from the speaker cabinets that normally gets transferred into whatever the speakers are sitting on. If you set speakers on a wood table, the wood table will enhance some frequencies much like the sounding board in a piano. Of course, we don’t want to hear these extra frequencies.
So, this special, super product designed to go under your speakers is really nothing more then a thick mouse pad. Well guess what? You guessed it. Buy a couple of cheap mouse pads and put those buggers under your speakers. It does the same thing for a fraction of the cost. In fact, the mouse pads under my speakers were free promos from AMD. They didn’t cost me a dime.
Final Note
Well. That’s about it for this edition of tips. Don’t take these words as rule of thumb. All project studios, equipment and spaces are different. Use these tips as a general guideline to perfecting your space. Good luck and have fun.


Recent Comments