MIDI Connection Overview
I’ve had a lot of people ask me how all my keyboards are connected. Are they all MIDI connected? How did you wire it? How do you keep it all straight?
I’m not sure how other people with 30+ keyboards wire their rooms, but here is the method I’ve come up with through trial and error. It seems to work well and isn’t that hard to keep track of things.
MIDI Basics
If you already understand the basics of MIDI you can jump to Part 2. If you don’t have a full understanding (or you have a limited understanding of MIDI) I’ll do my best to explain it. Let’s start with a couple analogizes to fully confuse you right out of the gate.
In simple mechanical terms MIDI is like a player piano. Paper piano rolls are covered in holes. Each hole in the paper is a note to be played on the piano. To “record” a player piano roll someone played a piano designed to mark the paper for each note played (they would punch the holes later). If during the “recording” there was a mistake in the musical piece – say they hit a wrong note – you could punch out the correct note later.

A section of a player piano roll. The longer holes in the paper indicate the note was held longer.
MIDI is much the same way — but bigger. A basic MIDI signal consists of when the note starts, when it ends, how loud it is played, and any other controls used like foot petals, pitch bend wheels, etc (there is far more to it than that, but we’re just covering basics right now).
Instead of a paper roll, all this information is transmitted over a MIDI channel – much like a radio. Something transmits a MIDI signal and something else receives it. The difference between MIDI and radio though is MIDI actually carries no audio sounds. MIDI only tells the device what to play. The device itself makes the audio sound.
A MIDI device (like a synth, drum machine or sequencer) can transmit this data over a MIDI channel. If there is another MIDI device listening on this MIDI channel it will play exactly what it is receiving. A standard MIDI cable connection can carry 16 channels of this information. You can connect 16 different synths to a standard connection, set each synth to receive a different MIDI channel, and control them all from one main MIDI transmitter (a controller or sequencer).
If you want to play the synth on MIDI channel 1 set your controller to transmit on MIDI channel 1, hit and note, and the synth on channel 1 will play. Change to transmit on channel 2 and the next synth will play.
So, a MIDI signal can tell the device what to play, when to play it. For the device to play it has to be tuned to the right radio station (AKA Channel) to receive the information.
Confused? Good. Let’s continue. There’s more.
MIDI Connections
Remember when I said MIDI was like a player piano and a radio? Forget all that. It is really a simple computer network. MIDI hardware is connected by daisy chaining MIDI devices together using a 5 pin DIN cable. These connect to three different types of MIDI jacks on the back of your MIDI device. These jacks are In, Out and Thru. People new to MIDI are often confused by what these connections actually do. Let me explain.
- IN: This is pretty straight forward. The signal enters the MIDI device through MIDI In.
- OUT: Out is the jack you transmit your signal out of (keep reading).
- THRU: Passes information from MIDI In.
The confusion is often how to use MIDI Out. Logically one would assume you connect MIDI cables from Out to In to Out to In. This only is correct if you are hooking up two devices. If you connect more than two you want to use the Thru connection. Think of Thru as a “Y” cable from MIDI in. You only use “Out” if you want to directly transmit a MIDI signal created by device itself.
Let me try to explain better with a couple sample MIDI configurations.
Example 1:

You are on stage and you have 4 synths. One is a keyboard and the other three are modules in a rack. You want to be able to control all the synths from one location. Connect MIDI Out from the controller to MIDI In on the first module. Connect a cable to Thru on the first module and connect that to MIDI In on the second module. Connect a cable to Thru on the second module and connect it to MIDI In on the third module.
Configure module 1 to receive on MIDI channel 1, module 2 to MIDI channel 2 and module 3 to MIDI channel 3.
When you transmit on MIDI channel 3 from the controller, the data goes into module one and is passed to the Thru connection without being affected. Module one will listen to this data but it won’t do anything with it because it is instructed to only react to signals on MIDI channel 1. The same thing happens in module two.
Example 2:
 We are going to use the same set up as before but insert a sequencer computer. The configuration for the three modules remain the same the only difference is how we move the signal to and from the controller and computer.
The sequencing software has the ability to route your MIDI signal to a particular channel. Instead of using the controller to choose which channel we want to transmit on we use the sequencer computer. The signal goes in and out of the controller first and thru’s to the other modules. I’m not going to go into detail on how to echo signals in software because it is different for each application. You’ll have to figure that part out youself.
In real world terms, this is how it would work.
You want to use module 1 to play a bass sound, module 2 for organ, and module 3 for drums.
Set module 1 to your bass sound. Configure your sequencer to echo out to channel 1. When you play the controller you should hear the bass sound. Record you bass line. When you play back the bass line in the sequencer it should play. Now do the same for the drum line. Set the sequencer to echo out on channel 3. When you play the controller you should hear drum sounds. Do the same for the organ sound.
Now you’re recording MIDI and writing a lovely little song.
Some of you might say “But I would like to replace module 1 with an actual keyboard and be able to record using that too.”
Yes, you can do that. What you need though is a MIDI interface with 2 or more MIDI in jacks.
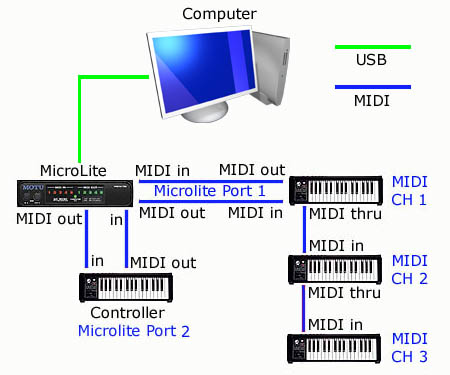
Example 3:
For this example I’m going to include the MOTU Microlite USB MIDI interface (only because that is what I use and the later parts of this writing will make more sense if I keep things consistant). The Microlite has 5 MIDI In and Out “ports”. Each port acts as a single regular MIDI connection with 16 channels. 5 ports gives us the ability to have 80 total MIDI channels.
 The Microlite connects to the computer via USB. The new synth in our setup connects to MIDI in/out on the Microlite port one. The other two modules (Channel 2 and Channel 3) are connected using the Thru from out new synth. We connect our other main controller to in/out on Port two.
When you want to use the new synth as a controller you configure your sequencer software to receive on the Microlite Port One. If you want to use the original controller you receive on Port Two. You echo out to the other modules the same as you did in the second example.
To tell the sequencer where to find the drum sound (which was on module three remember) you point the recorded MIDI track to transmit on Microlite Port 1, MIDI channel 3.
If you wanted to have 5 synths and you want each to act a controller, just do away with the Thru connections all together and just hook each synth to MIDI in/out on each of the five Microlite ports. Each synth would then have 16 channels of MIDI dedicated to it. This is handy if you have a milti-timberal synth which can receive different MIDI channels and play a unique sound for each.
There you go. Pretty simple really.
Actually, it isn’t. I’m not going to lie to you. You’ll run into some issues with your sequencing software. Not every MIDI device made has a Thru. Some keyboards send and receive on several channels at once. It will take time to figure the mess out. That said, the above is the basic wiring configuration. If you follow this at least you know your wiring will be ok.

")


Recent Comments